Are you ready to extend the life of your lawn mower and keep your lawn looking pristine? Checking the oil in your lawn mower is a simple yet crucial task that ensures your machine runs smoothly and efficiently.
Imagine mowing your lawn without the worry of sudden breakdowns or costly repairs. By learning how to check the oil in your lawn mower step by step, you not only safeguard your equipment but also save time and money. In this guide, you’ll discover straightforward steps to check your mower’s oil, empowering you with the knowledge to maintain it like a pro.
Let’s dive in and give your lawn mower the care it deserves!
Quick Navigation
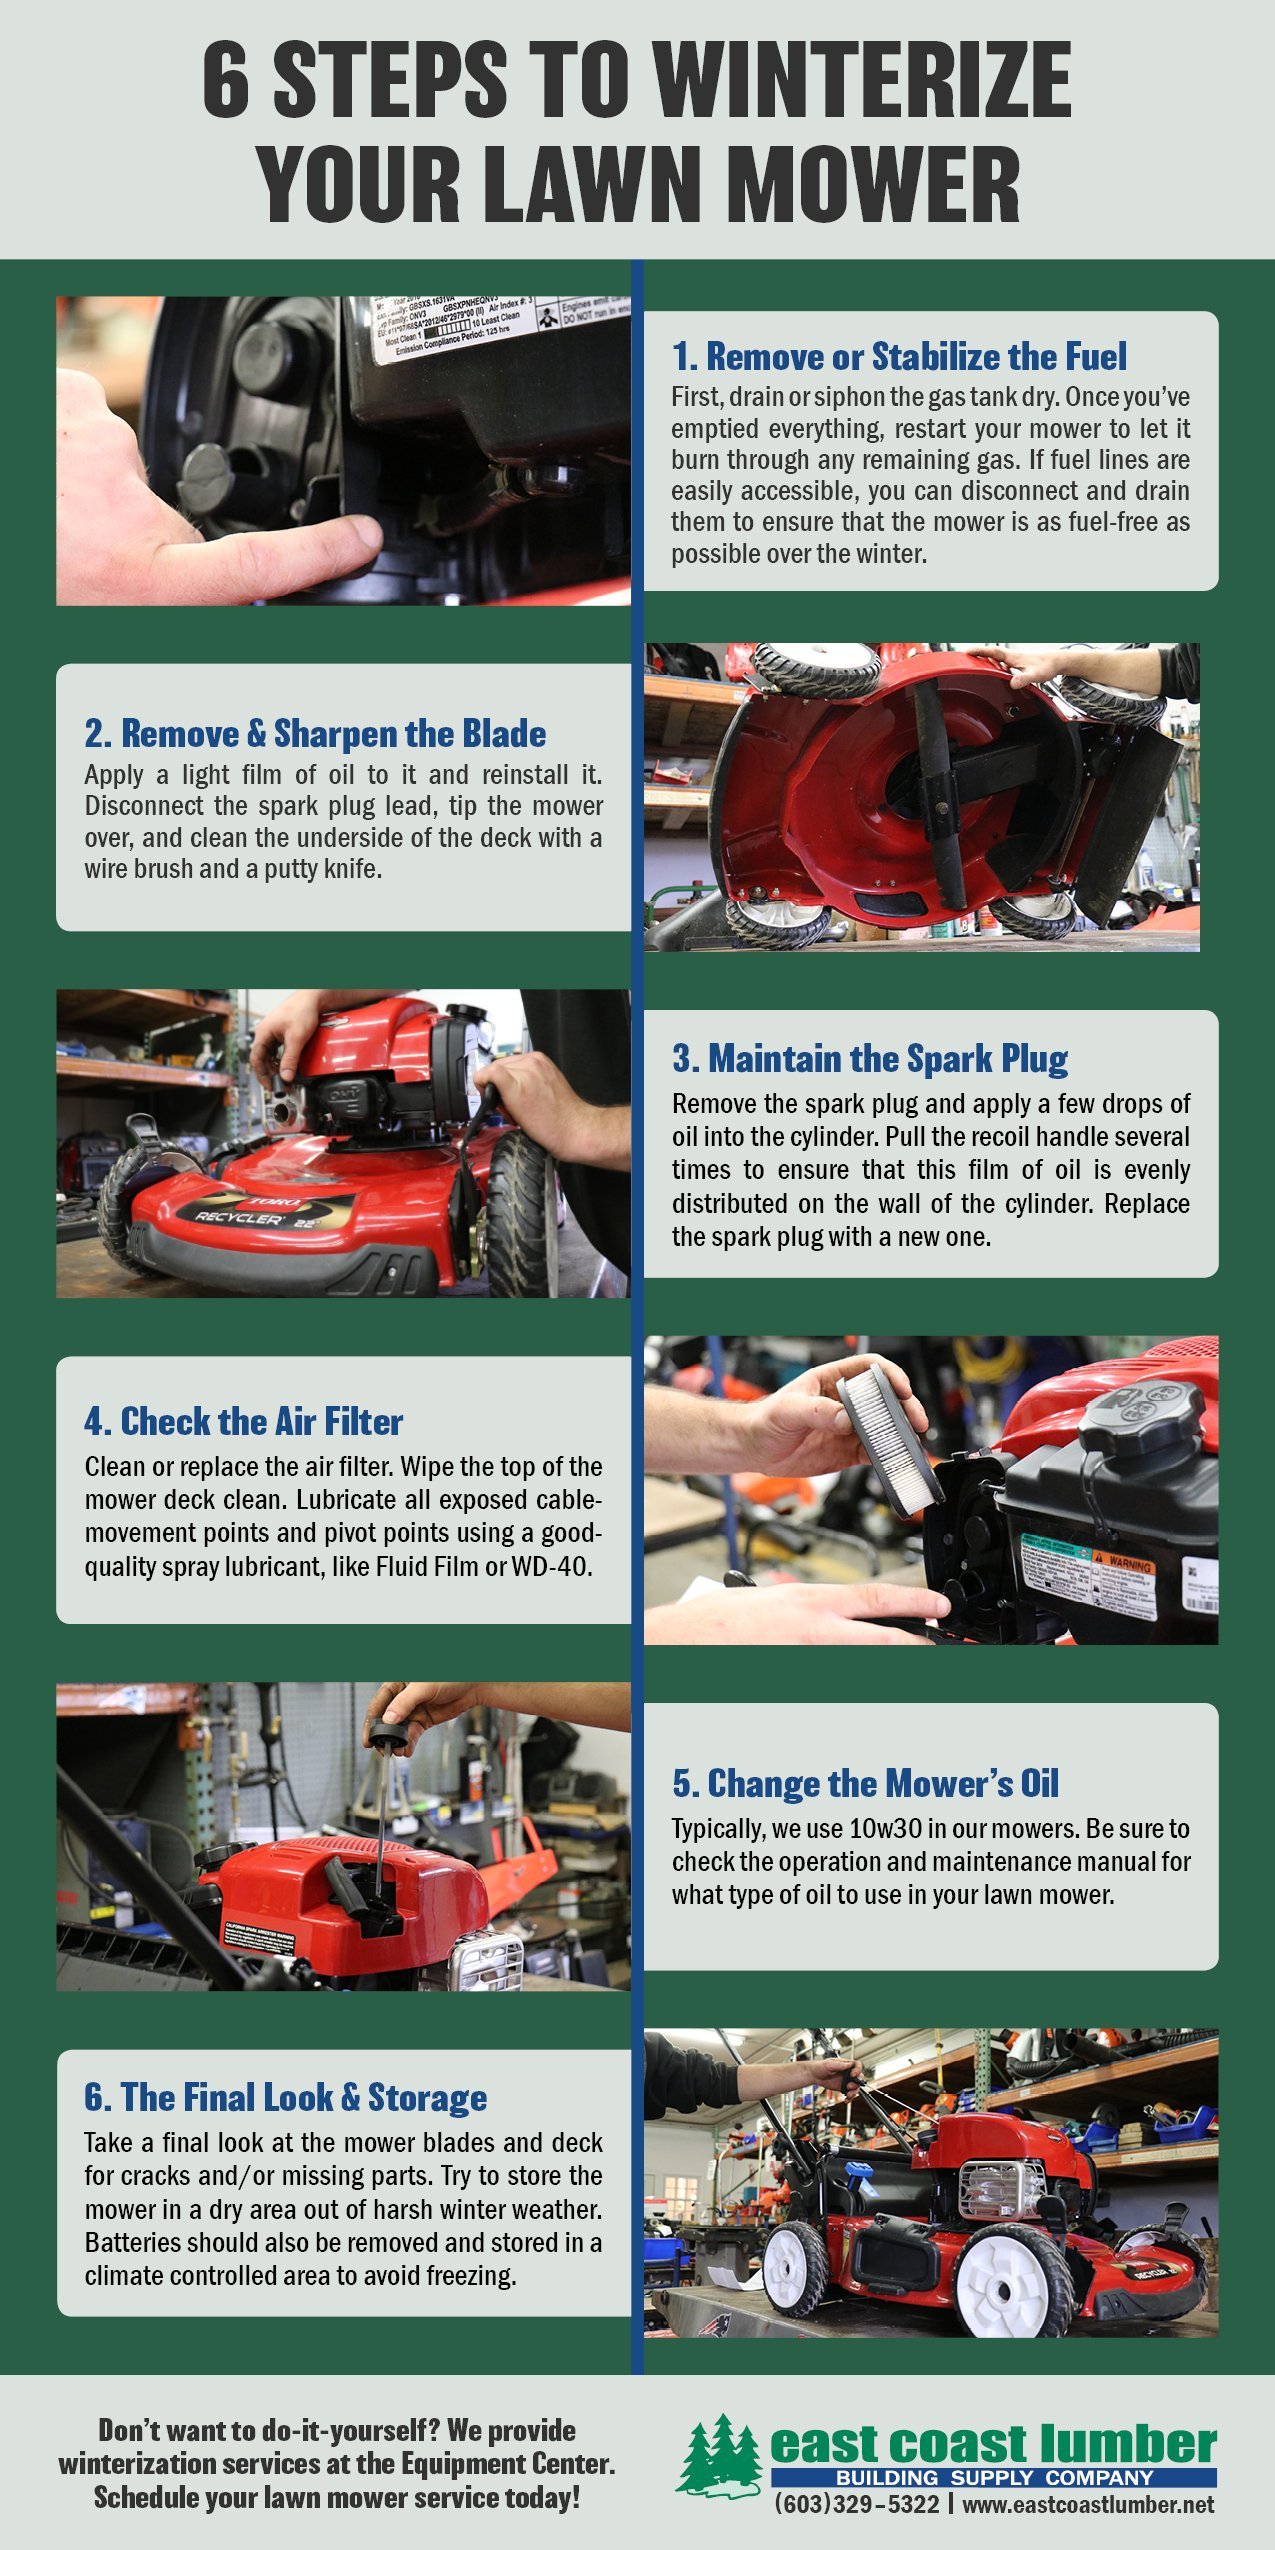
Gathering Necessary Tools
First, find a clean ragor paper towel. It helps to wipe oil off. You need the lawn mower’s manualtoo. It shows the oil type and amount. Next, get a funnel. Use it to add oil without spilling. A small cup can help measure the oil. Make sure you have the right type of oil. Check the bottle for the correct label. Finally, have a flat surfaceready. This keeps the mower stable while checking the oil. These tools make the job easy and quick.

Credit: www.youtube.com
Safety Precautions
Always wear gloves when checking the lawn mower oil. Eyes need protection too. Safety glasses are important. Ensure the mower is off and cool. Remove the spark plug wire for safety. This prevents accidental starts. Never check oil near open flames. Keep the area well-ventilated. Avoid smoking nearby. Oil can be flammable. Have a fire extinguisher ready. Dispose old oil properly. Follow your local guidelines. Clean spills quickly. Oil is slippery. Wipe the mower down after checking. This prevents buildup. Safety first always.
Positioning The Lawn Mower
Always place the lawn mower on a level surface. This helps in checking the oil correctly. If the mower is tilted, oil readings might be wrong. A flat surface ensures safety. It also prevents oil from spilling out. Make sure the ground is stable. Avoid hills or slanted areas. A garage floor or driveway works well.
First, make sure the engine is turned off. Engines can be hot. Always wait for it to cool down. This stops you from getting burned. Ensure the key is removed. This prevents any accidental start. Double-check the engine’s off position. Safety comes first.
Credit: www.eastcoastlumber.net
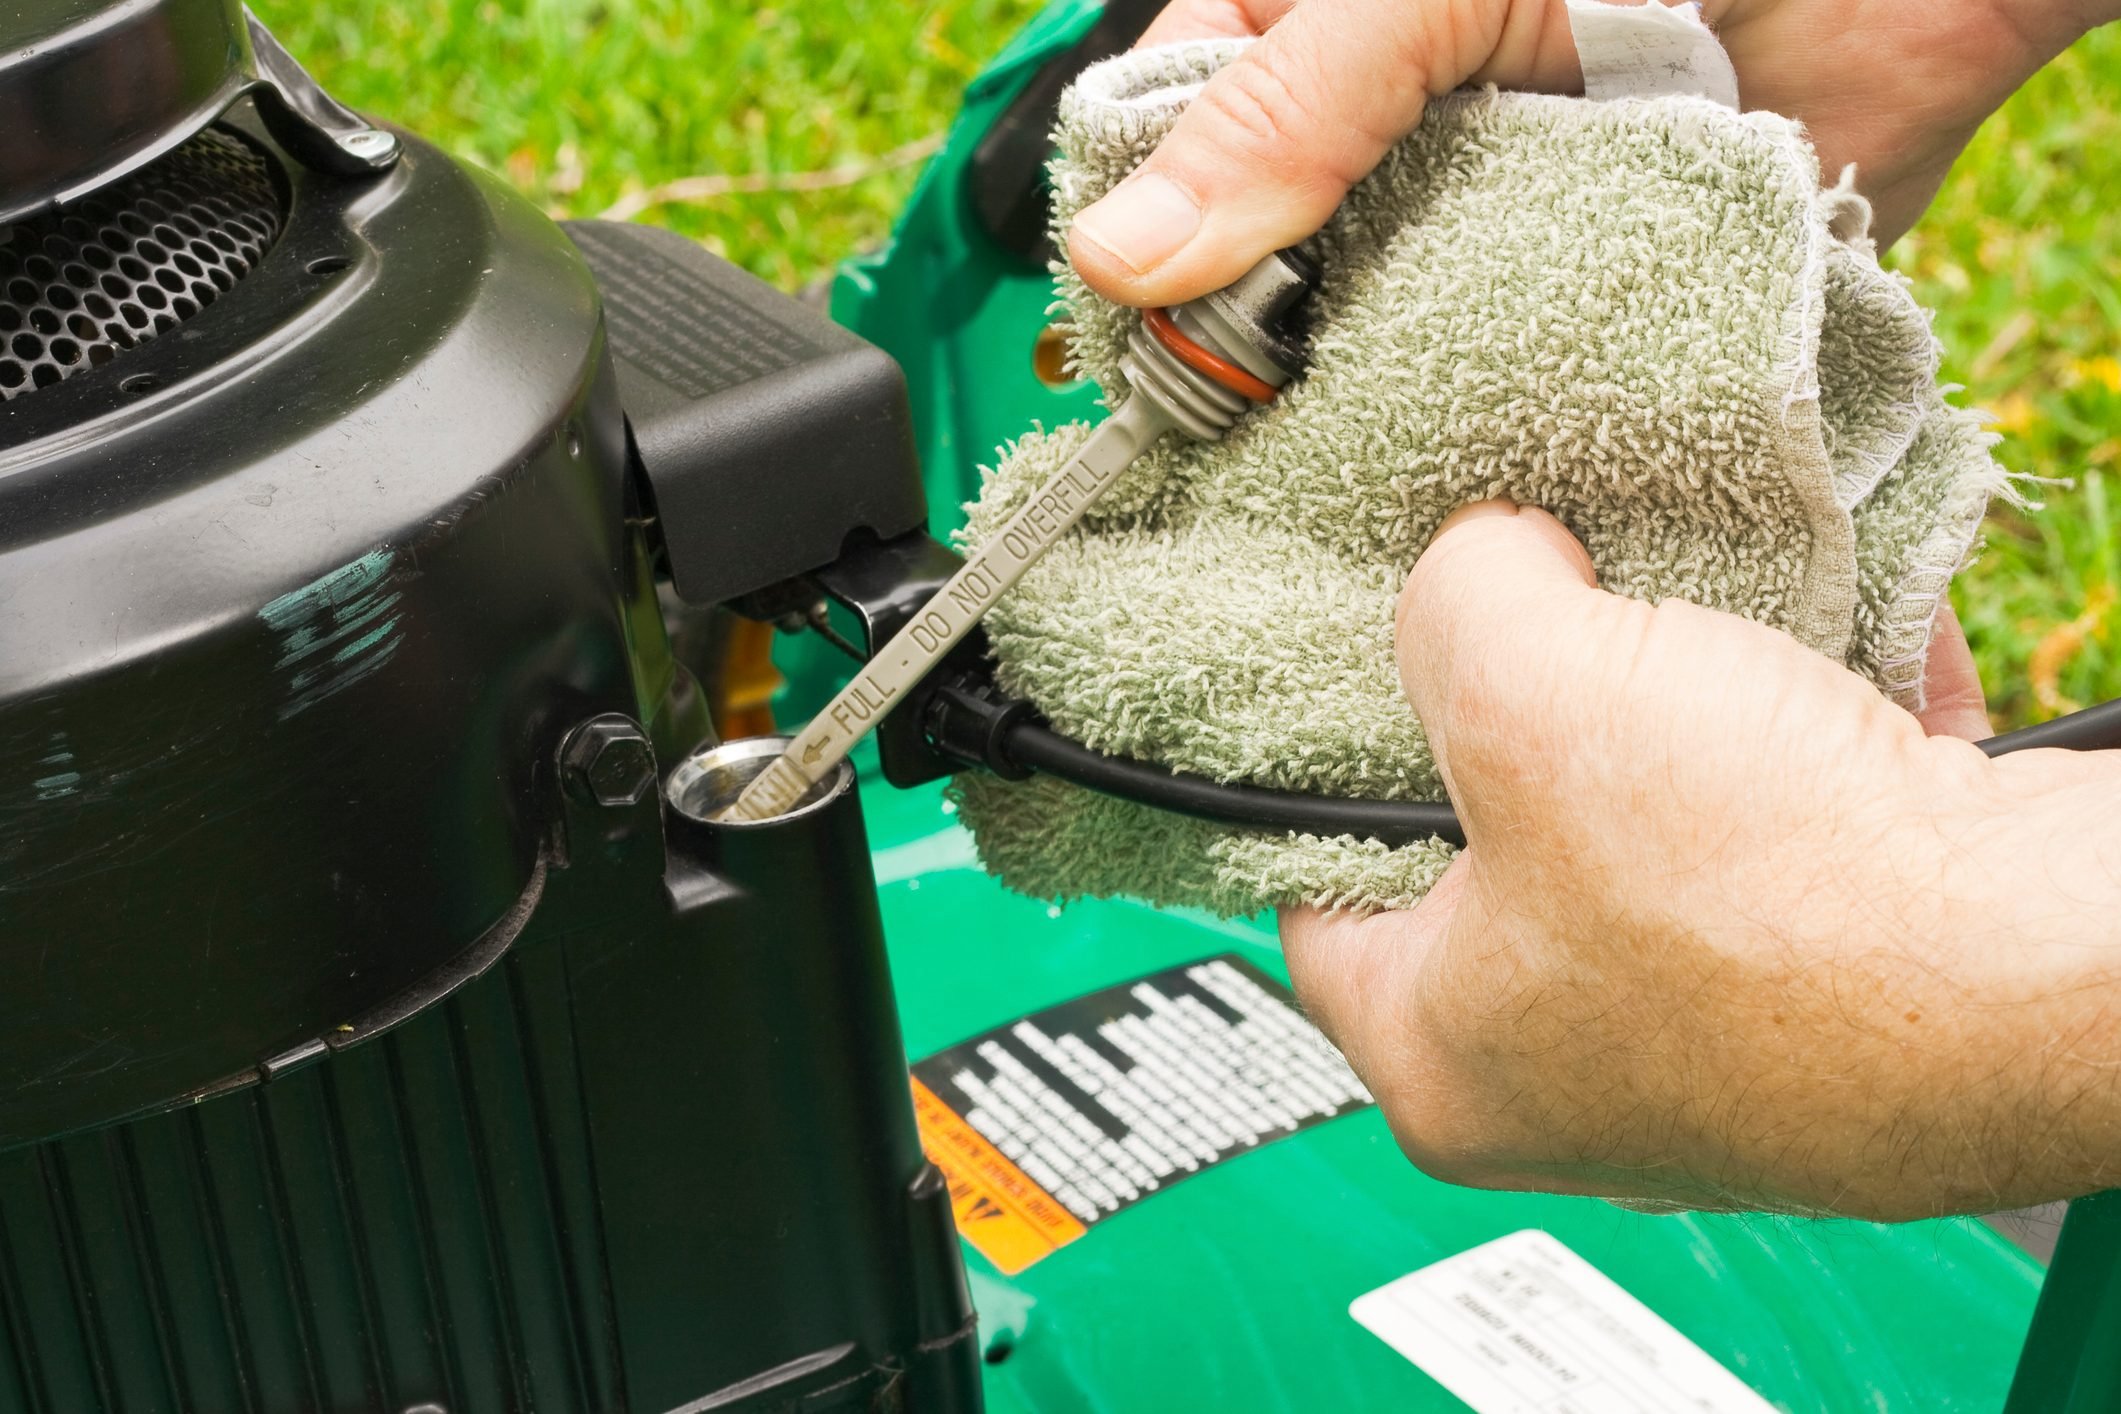
Accessing The Oil Dipstick
Locate the oil dipstick by opening the lawn mower hood. Pull out the dipstick to check the oil level.
Locating The Dipstick
Find the oil dipstick near the engine. It usually has a bright handle. Look for a small tube sticking out. The dipstick is often yellow or orange.
Removing The Dipstick
Pull the dipstick out slowly. Wipe it with a clean cloth. This removes old oil marks. Insert the dipstick back into the tube. Push it all the way down.
Pull the dipstick out again. Look at the oil level. It should be between the marks. If not, add more oil.
Checking Oil Level
First, make sure the mower is off. Wait until the engine is cool. Find the dipstick. It is usually near the engine. Pull it out slowly. Use a clean cloth to wipe it. Make sure there is no dirt or grass on it.
Put the clean dipstick back into the tube. Push it all the way down. Make sure it fits snugly. Then, pull it out again. This helps get a clear reading.
Look at the end of the dipstick. You will see oil on it. Check the oil level. It should be between the “Full” and “Add” marks. If it is low, add oil. Always use the right type of oil for your mower.
Interpreting Oil Condition
Step-by-step, check your lawn mower’s oil to ensure a smooth operation. Begin by locating the oil dipstick. Pull it out, wipe it clean, and reinsert. Remove again to check oil level and condition. Regular checks can prolong engine life.
Assessing Oil Color
Oil color tells a lot about its condition. Fresh oil is clear and golden. Over time, it turns darker. Dark oil may be due for a change. Check oil in daylight for best results.
If oil looks black, it needs replacing. Milky oil could mean water in the engine. This is not good. Change it soon. Keep mower in a dry place to avoid this.
Checking For Contaminants
Contaminants can harm your mower. Look for dirt or debris in the oil. These could damage the engine. Clean oil is crucial for a healthy mower.
If you find bits in the oil, change it. Check the oil filter too. It might need cleaning or replacing. Regular checks can save money on repairs.
Refilling Or Changing Oil
Adding Oil if Necessary:Check the oil level first. Remove the dipstick and wipe it clean. Insert it back and pull it out again. Look at the oil mark. If it’s below the line, add more oil. Use a funnel to pour oil slowly. Do not overfill. Check the level again with the dipstick. Add more if needed, but be careful. Close the oil cap tightly once done.
Deciding on an Oil Change:Old oil looks dark and dirty. New oil is clear and light. If the oil looks dark, change it. Run the mower for a few minutes first. This warms up the oil. Turn off the mower. Remove the oil plug and let the old oil drain. Replace the oil filter if your mower has one. Add new oil as shown in the previous steps.
Properly Securing The Dipstick
Ensure the lawn mower is on flat ground. This helps get a correct oil level. Locate the dipstick. It’s usually near the engine. Pull it out carefully. Wipe it clean using a cloth. Now, insert it back fully. Make sure it is snug. This prevents wrong readings. Oil should be checked regularly. It keeps the mower running well. Always wear gloves when handling oil. This keeps hands clean and safe. Double-check if the dipstick is tight. Loose dipsticks might cause leaks. Handle the mower gently. It prolongs its life. Proper maintenance saves money. Following these steps is easy. Anyone can do it.
Regular Maintenance Tips
Checking your lawn mower’s oil is essential for its longevity. Start by placing it on a flat surface. Locate the oil cap, remove it, and wipe the dipstick clean. Reinsert the dipstick, remove again, and check the oil level. Ensure it’s within the recommended range for optimal performance.
Setting A Maintenance Schedule
Creating a regular maintenance schedule keeps your lawn mower healthy. Check the oil level every two weeks. Inspect the air filter monthly. Sharpen the blades at the start of each season. Follow the manufacturer’s guidelines for best results. A well-maintained mower runs smoothly. It also lasts longer. Set reminders on your phone or calendar. This ensures you never miss a check-up.
Choosing The Right Oil Type
Selecting the correct oil is vital for your mower’s engine. Use SAE 30 for warm climates. Choose SAE 10W-30 for varying temperatures. Check your manual for specific recommendations. Using the wrong oil can harm your mower. It may cause the engine to overheat. Always use fresh oil. Old oil loses its effectiveness. Keep a bottle of oil in your garage. This way, you’re always prepared for an oil change.
Credit: www.familyhandyman.com
Conclusion
Checking your lawn mower’s oil is simple. Follow the steps carefully. Regular checks keep your mower running smoothly. Prevent damage by ensuring oil levels are correct. Clean oil means better performance. Safety first: always turn off the mower. Use the dipstick for accurate readings.
Top-up when necessary. Proper maintenance extends your mower’s life. It’s an easy task that saves money. Enjoy a well-maintained lawn with less stress. Routine checks can prevent unexpected issues. Stay proactive with your lawn care. Your mower will thank you for it.
Keep your lawn mower ready for action!