Are you having trouble getting your lawn mower to start? You might be dealing with a faulty starter.
Understanding how to bench test a lawn mower starter can save you time, money, and hassle. Imagine the satisfaction of diagnosing and fixing the problem yourself, without waiting for a repair shop or spending a fortune on new parts. In this guide, you’ll discover the simple steps to test your lawn mower starter right at home.
By the end, you’ll have the confidence to tackle this common issue head-on, ensuring your mower is ready to keep your lawn looking its best. Dive in, and let’s get your mower back in action!
Credit: discountstarterandalternator.com
Quick Navigation
Essential Tools
A multimeteris a handy tool. It measures voltage and current. Set it to the correct mode. Connect the probes to the battery. Check the voltagereading. Low voltage means a weak battery. Ensure all connections are tight.
Wrenchesand screwdrivers help remove bolts and screws. Choose the right size. Use a wrench for tight bolts. Screwdrivers are for screws. Keep them handy while testing. They make work easy.
A battery chargerkeeps the battery strong. Connect it to the battery. Ensure the red clip is on positive. The black clip goes on negative. Check the charge level often. A fully charged battery gives the best results.
Credit: discountstarterandalternator.com
Safety Precautions
Always wear protective gear like gloves and goggles. Gloves protect your hands from cuts and bruises. Goggles keep your eyes safe from flying debris. Never skip wearing safety equipment. It is very important.
Work in a well-ventilated area. Fresh air is necessary. Fumes from the starter can be harmful. Open windows and doors. Use fans if needed. Ventilation helps you breathe easy and stay safe. Never work in a closed space.
Before starting, disconnect the power source. This prevents electrical shocks. Remove the battery or unplug the mower. Safety is the top priority. Ensure no electricity flows while testing. Double-check before you begin.
Locating The Starter
First, find the user manual for your lawn mower. The manual has lots of helpful information. Look for a section about the starter motor. It tells where the motor is on your mower. Reading this will save time and effort.
The starter motor is usually near the engine. It is a small, round part. Check the diagram in the manual. This will help you identify the exact location. Knowing the place helps in testing.
Removing The Starter
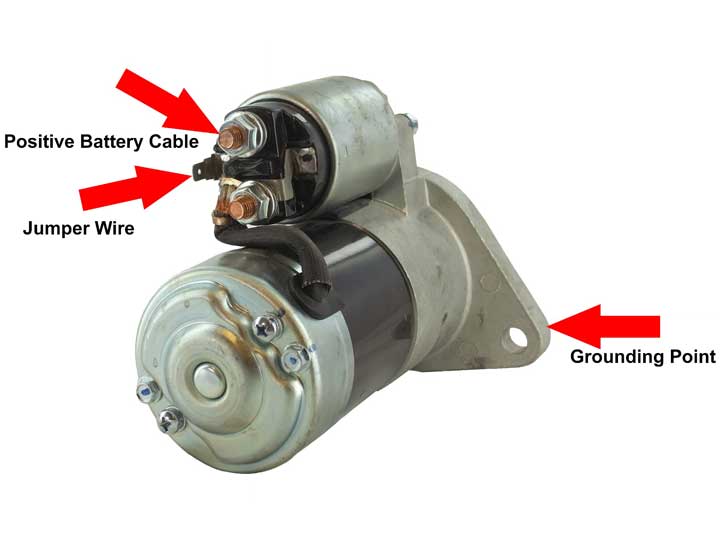
Safety comes first. Make sure the battery is off. Find the starter wires. They connect the starter to the battery. Carefully unplug these wires. You might need a tool. A screwdriver can help. Avoid pulling hard. Wires can break easily. Check for any labels. These show where each wire goes.
Locate the bolts on the starter. Use a wrench to loosen them. Turn each bolt slowly. Hold the starter with one hand. It might fall when bolts are loose. Remove the bolts completely. Keep them safe for later. The starter should now be free. Lift it gently from the engine. Check for any remaining wires. Make sure they are all disconnected.
Setting Up The Test
Choose a clean and flat spacefor testing. This helps to keep all tools in order. Ensure you have good light to see your work. Gather all needed tools like a multimeter and wrenches. Keep them within easy reach. Make sure the area is free from clutter. This prevents accidents. Always wear safety gloves and glasses. They protect you from harm.
Set the multimeter to check volts or ohms. Connect the red lead to the positive terminal of the battery. Attach the black lead to the negative terminal. This checks the battery power. If the multimeter shows zero, the battery might be dead. Check connections if readings are unclear. Always handle the multimeter with care. Do not let the leads touch each other. This avoids short circuits.
Performing The Bench Test
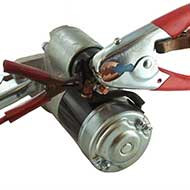
Start by connecting a voltmeter to the starter. Ensure the connections are secure. Turn the starter on. Check the reading on the voltmeter. It should show a stable voltage. If the voltage is low, the starter might be faulty. Ensure the battery is fully charged. Repeat the test for accuracy.
Power the starter and listen carefully. A smooth sound is normal. Clicking or grinding noises indicate problems. These sounds mean the starter is not working well. Investigate further if you hear these noises. It might need repair or replacement. Always ensure safety while testing. Keep fingers clear from moving parts.
Interpreting Results
A healthy lawn mower starter shows clear signs. It should spin smoothly. The engine cranks without delay. No strange noises come from the starter. The starter motor engages the flywheel quickly. Power flows without interruption. The battery remains stable during the test. These indicators mean the starter is in good shape.
A faulty starter struggles with basic tasks. Clicking sounds might be heard. The starter might spin but not engage. Engine cranking is slow or non-existent. Smoke or burning smells are warning signs. The battery drains faster than usual. Power may cut off suddenly. These signs suggest the starter needs attention.
Reinstallation Process
Testing a lawn mower starter involves several steps. Disconnect it from the mower, then connect it to a battery. Observe if the starter spins and engages properly, ensuring functionality before reinstallation.
Reconnecting Wires
Start by locating the correct wires for the starter. Match each wire to its corresponding terminal. This ensures proper function. Use your fingers to tighten the connections. Loose wires can cause problems. Make sure each wire is snug and secure.
Securing The Starter
Place the starter back into its original position. Align it with the mounting holes. Use screws or bolts to fasten it. Tighten each one carefully. Overtightening can cause damage. Keep the starter stable. Check it doesn’t move or wobble. This ensures it stays in place.
Maintenance Tips
Check the starter parts often. Look for any loose wires or screws. Notice any unusual sounds. Fix these issues quickly. This keeps the starter working well. Examine belts and cables too. They should not be worn out. Replace them if needed. Examine everything once a month.
Dirt can make the starter not work well. Clean the starter parts regularly. Use a soft cloth or brush. Remove dust and grime gently. Avoid using water. Water can damage parts. Keep the area around the starter clean too. This helps the starter last longer.

Credit: www.youtube.com
Conclusion
Bench testing a lawn mower starter is simple. Follow the steps carefully. Use the right tools to ensure accuracy. This method saves time and money. You can fix minor issues yourself. Identify problems early and maintain efficiency. Regular checks prevent bigger problems later.
Now you know the basics of starter testing. Apply this knowledge to keep your mower running smoothly. Stay proactive in your maintenance routine. Your lawn mower will thank you. Happy mowing!