Is your lawn mower refusing to start, leaving your grass looking more like a jungle than a neatly trimmed lawn? It might be time to replace the starter solenoid.
This small but crucial component is often the culprit behind a mower that won’t start. Don’t worry; you don’t need to be a mechanic to fix it. With a few tools and a bit of guidance, you can get your mower running smoothly again.
You’ll learn step-by-step how to replace a starter solenoid on your lawn mower, saving you both time and money. Imagine the satisfaction of solving this problem on your own and getting back to that perfectly manicured lawn. Let’s dive in and get your mower back in action!
Quick Navigation
Tools And Materials Needed
Gather all necessary tools before starting. You’ll need a screwdriver for removing screws. A wrench is important for loosening bolts. Have a pair of gloves to keep your hands safe. Safety glasses protect your eyes from dirt and debris.
Replacement solenoid is a must-have. Make sure it matches your lawn mower model. A voltage tester checks the power connections. Finally, keep a rag handy for cleaning any oil spills. Having these tools ready makes the job easier and faster.
Identifying The Starter Solenoid
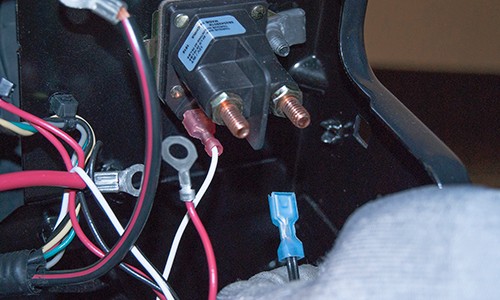
The starter solenoidis usually near the battery. Check under the hood. Look for a small, round part with wires attached. It might be on the side of the engine. Often near the starter motor itself. Finding the solenoid is the first step.
A clicking soundcan indicate a bad solenoid. If the mower won’t start, check the solenoid. Sometimes, the engine cranks slow or not at all. Another sign is no sound when turning the key. These are hints that the solenoid might need replacing.
Safety Precautions
Always turn off the lawn mower first. Disconnect the battery to avoid shocks. Use a wrench to loosen the battery cable. Make sure the wrench does not touch any metal parts. This prevents sparks and injuries. Store the removed cable safely away from the battery.
Wear gloves to protect your hands. Put on safety goggles to shield your eyes. Old clothes are best to wear. They might get dirty or damaged. A dust mask can protect your lungs. This is important when working with old parts.
Removing The Faulty Solenoid
Locate the solenoid near the lawn mower’s engine. It is often close to the battery. Check the manual for the exact location. Use a screwdriver to remove any covering parts. Ensure the mower is turned off to stay safe.
Find the wires attached to the solenoid. They connect the battery and starter. Use a wrench to loosen the nuts. Carefully pull the wires away. Remember their positions for reattachment. Mark them if necessary.
Locate the bolts that secure the solenoid. Use a wrench to unscrew them. Keep the bolts in a safe place. The solenoid should now be free. Lift it away from the mower gently. Ensure nothing is damaged.
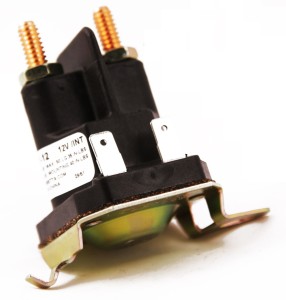
Installing The New Solenoid
Replacing a starter solenoid on a lawn mower is simple. Disconnect the battery and locate the old solenoid. Remove it carefully, then install the new solenoid in the same position. Reattach the battery. Your lawn mower is ready to start again.
Positioning The New Solenoid
First, find the right spot for the new solenoid. It needs to fit well. The solenoid should be near the engine. This helps with power flow. Make sure it is not touching anything hot. It needs space for air. This keeps it cool.
Reconnecting Electrical Wires
Begin by identifying the wires. They are different colors. This helps keep track. Attach the wires to the solenoid terminals. Use a screwdriver for this. Make sure they are tight. Loose wires can cause problems. Double-check the connections. They must be correct.
Securing The Solenoid
Use screws to hold the solenoid in place. This keeps it steady. A wrench can help tighten the screws. Make sure they are firm. The solenoid should not move. This ensures good performance. Check all parts after finishing. They should be secure and stable.

Credit: www.youtube.com
Testing The Replacement
Reconnecting the Batteryis a crucial step. First, attach the battery cable. Use your hands carefully. Ensure it is tight and secure. This avoids any loose connections. Tight connections are safe. Next, check all wires again. Look for any visible damages. Damaged wires can cause issues.
Starting the Lawn Moweris the next step. Turn the key gently. Listen for the engine noise. It should start smoothly. If not, check the solenoid again. Sometimes parts need adjusting. A smooth start means success. Keep an eye on the mower while running. Look for any unusual sounds. If all is well, your job is done. This process ensures everything works right.
Troubleshooting Common Issues
Replacing a starter solenoid on a lawn mower can fix starting problems. Begin by disconnecting the battery. Remove the old solenoid and install the new one securely. Reconnect the battery, ensuring all connections are tight. This straightforward process can help restore your lawn mower’s functionality.
Starter Solenoid Not Engaging
The starter solenoid might not work. The solenoid sends power to the starter. Check the battery connections. They should be tight and clean. Dirty connections cause problems. Listen for a click when turning the key. No click means the solenoid is bad. Look for burnt wires. Burnt wires mean a short circuit. Replace bad wires right away. Check the solenoid coil. If the coil is open, it is broken. A multimeterhelps check the coil. Replace the solenoid if it is bad.
Engine Fails To Start
The engine won’t start without power. Check the battery charge. A dead battery stops the engine. Charge or replace the battery. Look at the fuel level. No fuel means no start. Fill the tank if it is empty. Check the spark plug. A worn spark plug won’t spark. Replace the spark plug if needed. Check the air filter. A dirty filter stops air flow. Clean or replace the filter. Ensure the ignition switchworks. A bad switch stops power. Test the switch with a multimeter. Replace the switch if it is faulty.
Credit: www.searspartsdirect.com
Maintenance Tips
Check the lawn mower before each use. Look for any signs of wear. Inspect the starter solenoid for damage. Ensure all parts are in good condition. Replace any worn-out parts promptly. Listen for unusual sounds during operation. Noises can signal potential issues. Always follow the manufacturer’s guidelines for maintenance.
Clean the electrical connections regularly. Use a soft brush to remove dirt. Ensure connectors are free of corrosion. Corrosion can affect performance. Apply a small amount of anti-corrosion spray. This helps protect connections. Make sure connections are tight. Loose connections can cause problems. Check the battery terminals too. Clean them if needed.
Credit: www.searspartsdirect.com
Conclusion
Replacing a starter solenoid on a lawn mower is manageable. With patience, you can tackle this task. First, gather your tools and safety gear. Next, follow the steps outlined in this guide. Ensure each connection is secure and tight. Test your mower after replacing the solenoid.
Listen for smooth operation. Regular maintenance keeps your mower running well. Save time and money by doing it yourself. Feel confident in caring for your lawn equipment. Learn more about mower repairs to boost your skills. Keep your lawn looking great with a reliable mower.