Is your lawn mower refusing to start, leaving your grass looking more like a jungle than a garden? Don’t worry—often, the culprit is a simple pull cord issue.
Replacing a pull cord might sound intimidating, but it’s easier than you think. Imagine having your lawn mower purring again with just a few simple steps. In this guide, you’ll learn exactly how to replace the pull cord on your lawn mower, saving you time and money.
Get ready to transform your mower back into the reliable machine it once was. Let’s dive in and get your mower back on track!

Credit: www.youtube.com
Quick Navigation
Tools And Materials Needed
First, gather the right tools. A screwdriver is essential. You will also need a wrench. Don’t forget the replacement cord. Make sure it’s the right size. A pair of pliers can help too. Having a knife nearby is good. It cuts the cord easily. Safety gloves are important for protection. Keep them handy. Also, have a clean cloth ready. It helps wipe dirt away.
A workbench can be useful. It provides a stable surface. Ensure all tools are within reach. This makes the task smoother. Organizing everything first saves time. This way, you can work efficiently.
Safety Precautions
Wear gloves to protect your hands. Safety goggles shield your eyes. Ensure the mower is turned off. Unplug the spark plug to prevent accidental start. Clear the area of tools and debris. Stable surface is essential for working. Keep children and pets away. Double-check all safety measures before beginning. Inspect tools for defects. A clutter-free area reduces accidents.
Use a workbench or sturdy table. Proper lighting helps you see clearly. Ensure a comfortable position for working. Avoid rush; take your time. Clear instructions are important. Stay focused during the process. Safety first always.
Removing The Lawn Mower Housing
Start by turning off the lawn mower. Make sure it’s not plugged in. Safety first! Next, locate the screws on the housing. Use a screwdriver to remove them. Keep the screws in a safe place. You don’t want to lose them. Lift the housing gently. Be careful not to force it. Check for any hidden screws. Sometimes they are hard to see. Once all screws are out, lift the housing completely. Now, the inside parts are visible.
Look at the pull cord area. Notice its position. This will help when replacing it. Cleaning the inside is a good idea too. Dust and grass can build up. Use a cloth for cleaning. Avoid using water. Water can damage parts. Now, the housing is removed. The next step is easier with a clear view.
Accessing The Recoil Starter
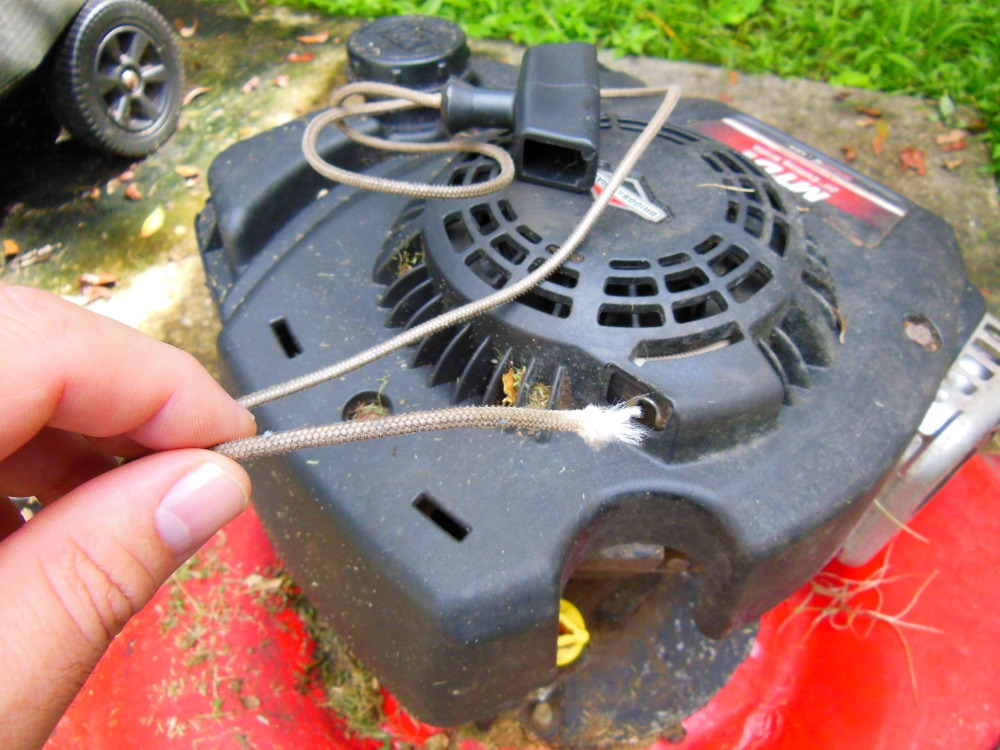
Start by turning off the lawn mower. Make sure it is cool before touching it. Locate the recoil starter on the mower. It is usually at the top. You might see a cover over it. Use a screwdriver to remove the screws. Keep the screws safe. Lift the cover gently. Inspect the recoil starter for any damage. Sometimes, dirt can hide inside. Clean the area if needed. Now, you can see the pull cord. Check the cord for any frays or breaks. If broken, you need a new cord. Make sure to buy the correct size. The recoil starter is now ready for a new pull cord. Follow these steps carefully.
Removing The Old Pull Cord
Begin by turning off the lawn mower. Safety first. Now, take a screwdriver. Remove the screws on the mower’s cover. Lift the cover gently. Look for the recoil housing. It holds the pull cord. Use the screwdriver again. Remove the screws on the recoil housing. Be careful while doing this.
Once open, locate the old pull cord. It’s usually tied to a pulley. Cut the old cord with scissors. Dispose of it properly. Remember, old pull cords can be sharp. Now, you are ready to install the new pull cord. It’s not too hard. Just follow these steps carefully.
Measuring And Cutting The New Cord
The new cord should be the same length as the old one. It’s important to use a tape measure for accuracy. Measure twice to be sure. Cut the cord with sharp scissors or a knife. Make a clean cut to avoid fraying. Tie a knot at one end of the cord. This helps it stay in place. Don’t forget this step. The knot is very important. Now, your new cord is ready to install. It will fit just right in the mower. Check it again to be sure everything is correct. Always double-check your work.
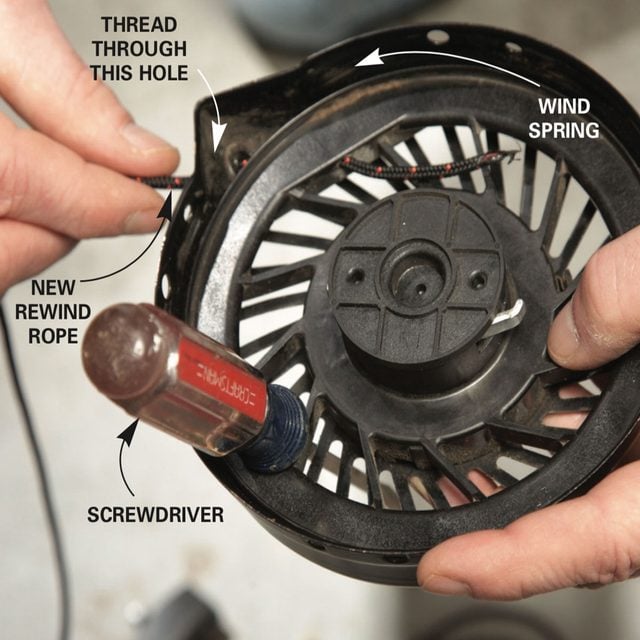
Attaching The New Cord
Start by threading the new cordthrough the handle. Make sure it is secure. Next, loop the cord through the starter pulley. Pull it tight to avoid any slack. Use a knot to keep the cord in place. A simple knot works best. Then, attach the cord to the recoil spring.
Be careful not to let the spring unwind. This step is crucial for a good fit. Once done, test the pull cord. It should recoil smoothly. If not, check for any tangles or loose ends. Adjust if needed for a perfect fit. Now, the lawn mower is ready to use again.
Credit: homefixated.com
Reassembling The Lawn Mower
First, make sure all parts are clean. Dirt can cause problems. Align the engine cover correctly. Use the screws to secure it in place. Tighten them well, but do not overdo it. Over-tightening can break the plastic. Check the pull cord. It should move easily. If not, adjust it.
Next, attach the spark plug. Ensure it is tight. Loose plugs can stop the engine. Refill the fuel tank. Use fresh fuel for best performance. Check the oil level too. Low oil can damage the engine.
Finally, test the mower. Pull the cord to start. Listen for any strange noises. If all sounds good, you’re done. Happy mowing!
Testing The New Pull Cord
Start by pulling the cord gently. Feel the smoothness. If the cord moves easily, it is installed right. Pull harder next. The mower should start. Listen for engine sounds. Quiet means trouble. Check the cord again. Make sure it’s tight. Tight cords work well. Test again if needed. Repeat until satisfied. Safety first. Don’t rush. Take your time. It’s important. A well-tested cord lasts longer. Enjoy mowing!
Credit: www.familyhandyman.com
Maintenance Tips For Longevity
Regular checks make the lawn mower last longer. Always clean the mower after use. Dirt can block parts. A clean mower works better and lasts longer. Tighten any loose screws to avoid damage. Loose parts can break or fall off.
Check the oil regularly. Old oil can harm the engine. Fresh oil makes the mower run smoothly. Keep the blades sharp. Dull blades tear grass, not cut it. Sharp blades cut grass cleanly and quickly. Replace the air filter if dirty. A clean filter helps the engine breathe better.
Conclusion
Replacing the pull cord on a lawn mower is simple. Follow the steps carefully. Always ensure safety first. Keep tools ready and organized. Check the cord’s condition regularly. Replace it when worn out or frayed. A well-maintained cord ensures smooth starts.
This task saves time and effort. Avoid frustration with a stuck mower. Enjoy hassle-free mowing with a fresh cord. Regular maintenance extends the mower’s life. Take pride in a job well done. Your lawn will thank you. Happy mowing!