Gardening can be challenging without the right tools. Seed dispensers are a must-have for every gardener.
They make planting seeds easier and more precise, saving time and effort. Whether you’re a seasoned gardener or just starting out, these hacks will help you use seed dispensers like a pro. Imagine planting rows of vegetables or flowers quickly and efficiently.
With these clever tricks, you’ll avoid common mistakes and ensure your seeds are planted at the correct depth and spacing. No more frustration or wasted seeds!
This guide will show you how to make the most out of your seed dispensers, turning your gardening tasks into smooth, enjoyable activities. Get ready to discover seven genius hacks that will transform your gardening experience.
Quick Navigation
1. DIY Seed Tape
Discover the clever use of DIY seed tape, one of the top seed dispenser hacks every gardener should know. It simplifies planting and ensures seeds are evenly spaced, leading to better growth.
If you’ve ever struggled with evenly spacing out your seeds when planting, DIY Seed Tape is a game-changer.
This simple, cost-effective method ensures your seeds are perfectly spaced, saving you time and effort. Plus, it’s a fun project that you can even do with kids.
Ready to give it a try? Let’s dive into the details!
Materials Needed
To create your own seed tape, you’ll need a few basic supplies:
- Toilet paper or paper towels
- Flour and water (for making glue)
- A small paintbrush or cotton swab
- Seeds
- Ruler
- Pencil
Using items you already have at home keeps this project budget-friendly. Plus, you can customize the tape to fit your garden’s specific needs.
Step-by-step Guide
Follow these simple steps to create your DIY seed tape:
- Prepare Your Work Area: Roll out a length of toilet paper or paper towels on a flat surface. Make sure it’s long enough to fit your garden row.
- Mix Your Glue: Combine equal parts flour and water to create a paste. This natural glue is safe for your plants and the environment.
- Mark Seed Spacing: Use a ruler and pencil to mark where each seed should go. Different seeds have different spacing requirements, so check your seed packet for guidance.
- Apply Glue: Dab a small amount of your flour-water paste onto each marked spot using a paintbrush or cotton swab.
- Place Seeds: Carefully place one seed onto each glue spot. Press lightly to ensure they stick.
- Fold and Dry: Fold the paper over the seeds to secure them, then let the tape dry completely.
- Plant the Tape: When you’re ready to plant, simply lay the seed tape in your garden and cover it with soil as directed on the seed packet.
Creating your own seed tape not only ensures even spacing but also makes planting quicker and easier. Have you ever tried making seed tape at home? What other gardening hacks have you found helpful? Share your thoughts in the comments below!
2. Recycled Bottle Dispenser
Gardening is a joy, but sowing seeds can be tricky. A recycled bottle dispenser is an easy and eco-friendly solution. This simple hack uses items you already have at home. It helps you control the flow of seeds and reduces waste. Let’s dive into the steps to create your own.
Tools Required
- Plastic bottle with cap
- Sharp scissors or a utility knife
- Masking tape
- Marker pen
- Sandpaper
Assembly Instructions
First, clean the plastic bottle and remove any labels. This ensures a smooth surface for your dispenser.
Next, use the marker to draw a small circle on the bottle cap. The size depends on the type of seeds you will use. Smaller seeds need a smaller hole.
Carefully cut out the marked circle using the scissors or utility knife. Be cautious to avoid injury.
After cutting, smooth the edges of the hole with sandpaper. This prevents any rough edges that might damage the seeds.
When not in use, place a piece of masking tape over the hole. This keeps the seeds secure inside the bottle.
Fill the bottle with seeds and screw the cap back on. Gently shake the bottle to dispense seeds evenly.
Congratulations! Your recycled bottle seed dispenser is ready. Happy gardening!
3. Salt Shaker Seed Dispenser
Seed dispersing can be quite a challenge, especially when working with tiny seeds. One genius hack that every gardener should know is using a salt shaker as a seed dispenser. This simple tool can make sowing seeds more precise and less messy.
Choosing The Right Shaker
Not all salt shakers are created equal. When selecting a shaker for your seeds, look for one with adjustable holes. This feature will allow you to control the flow of seeds.
If you have tiny seeds like lettuce or carrots, a shaker with small holes works best. Larger seeds like peas or beans will need shakers with bigger holes. You can find these at most kitchen stores or online.
Proper Usage
Using a salt shaker as a seed dispenser is straightforward. Fill the shaker with your seeds, being careful not to overfill it, which can lead to uneven distribution.
As you sow your seeds, gently shake the dispenser over the soil. This method ensures a more even spread and prevents clumping. You will find it easier than scattering seeds by hand.
Have you ever tried using a salt shaker for sowing seeds? If not, give it a shot next planting season. You might be surprised at how much simpler it makes the process.
Do you have any other seed-dispersing hacks that work? Share your tips and tricks with fellow gardeners in the comments below!
4. Paper Tube Seed Sower
Discover how to use paper tubes to make seed sowing easier. This hack helps gardeners plant seeds evenly and save time. It is perfect for small seeds that need precise placement.
Gardening is a delightful hobby, but it can sometimes be a challenge to sow seeds evenly. That’s where the Paper Tube Seed Sower comes in handy.
This simple tool, made from everyday items, can make your planting process smoother and more efficient. Let’s dive into how you can create your own!
Supplies List
To get started, gather the following supplies: Paper tubes (toilet paper or paper towel rolls), Scissors, Ruler, Tape, Marker, and Seeds. These items can be easily found around the house or at your local store. With these on hand, you’re ready to move on to the next step.
Construction Process
First, take your paper tube and measure it into 1-inch sections. Use the ruler and marker for accuracy. Once marked, cut the tube into these sections.
Next, cut a small opening at one end of each section. This will allow the seeds to pass through easily, but be careful not to make the opening too large.
After that, tape the sections together to form a line. Ensure the openings are all on the same side. This will help you control the flow of seeds.
Now, place your seeds inside the tube. Tilt the tube slightly and gently tap it to dispense seeds evenly into your garden bed. Using the Paper Tube Seed Sower makes planting quick and precise. It’s a great way to involve kids in gardening and teach them about nature and patience.
Have you tried using household items for gardening? What other hacks do you use to make sowing easier? Give the Paper Tube Seed Sower a try and share your experience!
5. Syringe Seed Planter
Gardening is an art that requires precision and care, especially when planting seeds. The Syringe Seed Planter is an ingenious tool that can help you sow seeds with perfect accuracy.
This hack is not only simple but also incredibly effective, making it a must-try for every gardener.
Necessary Equipment
To create your Syringe Seed Planter, you will need a few basic items:
- A plastic syringe (without the needle)
- Seeds
- Marker (optional)
The syringe serves as the seed dispenser. You can find these syringes in any pharmacy or online store. Ensure the syringe is clean and dry before use.
Planting Technique
Using the Syringe Seed Planter is straightforward. Fill the syringe with seeds, making sure they are not packed too tightly.
Gently press the plunger to dispense seeds into the soil. This technique allows you to control the number of seeds you plant and ensures even distribution.
You can mark the syringe with a marker to indicate measurements, helping you plant with consistent spacing.
Have you ever struggled with planting tiny seeds evenly? This hack can be a game-changer. Precise control over seed placement minimizes waste and maximizes growth potential.
Try using the Syringe Seed Planter in your garden, and see how it transforms your planting experience. What other creative hacks have you discovered in your gardening journey?
6. Egg Carton Seed Dispenser
Transform egg cartons into handy seed dispensers. These eco-friendly hacks simplify planting and save time, making them perfect for any gardener.
Growing your own garden can be incredibly fulfilling, but sometimes, the little things make a big difference. One small but mighty hack is the Egg Carton Seed Dispenser.
This simple yet effective tool can help you plant seeds with precision and ease, ensuring your garden gets off to a great start. Plus, it’s a fantastic way to recycle and repurpose materials you already have at home.
Materials And Tools
To create your Egg Carton Seed Dispenser, you’ll need just a few basic materials and tools. Gather an empty egg carton, a pair of scissors, a pencil, and some tape. You’ll also need your seeds and a bit of patience.
- Empty egg carton
- Scissors
- Pencil
- Tape
- Seeds
These items are likely already in your home, making this hack extremely budget-friendly.
How To Make
Creating your Egg Carton Seed Dispenser is straightforward. First, cut the egg carton in half lengthwise. You will use the bottom half with the egg cups.
Next, use a pencil to poke small holes at the bottom of each egg cup. These holes will allow the seeds to be dispensed easily. Take a piece of tape and cover half of each hole. This helps control the flow of seeds, so you don’t end up with too many in one spot. Place your seeds in the egg cups. When you’re ready to plant, simply tilt the egg carton and gently tap the seeds into the soil.
Why not involve your kids in this activity? It’s a fun and educational way to spend time together while teaching them about gardening.
Have you ever tried using an egg carton as a seed dispenser? What other household items have you repurposed for gardening? Share your tips and tricks in the comments!
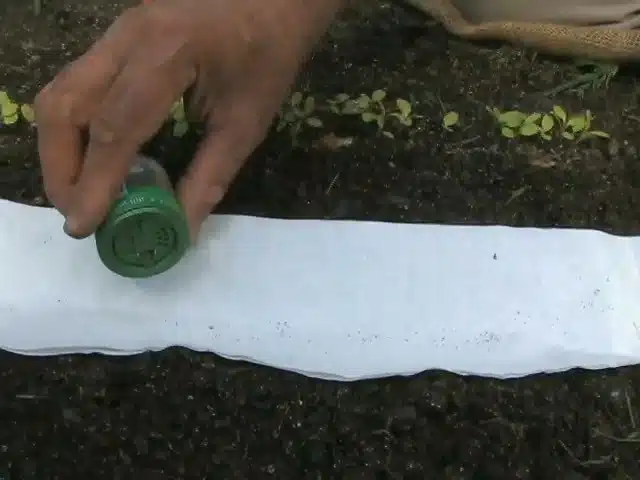
7. Spice Jar Seed Dispenser
Discover 7 smart hacks for using a spice jar seed dispenser. These hacks make planting easier and more efficient in your garden. They are perfect for any gardener looking to save time and effort.
Gardening can sometimes be messy and time-consuming, especially when sowing seeds. But what if I told you there’s a simple kitchen hack that could save you time and make your gardening more efficient?
Enter the spice jar seed dispenser! Dispensing seeds in an old spice jar is not only practical but also a great way to recycle. Let’s explore how you can turn your old spice jars into handy seed dispensers.
Selecting The Jar
First, choose the right spice jar for your seeds. The size of the holes in the jar’s lid is crucial. If you have small seeds like basil or lettuce, opt for a jar with smaller holes to better control the flow.
A jar with bigger holes will work best for larger seeds like peas or beans. Check your kitchen for empty spice jars. Clean them thoroughly to avoid any residue that might affect your seeds. A simple rinse with warm, soapy water should do the trick.
Application Method
Now that you have your jar, it’s time to fill it with seeds. Pour your seeds into the jar, filling it halfway to avoid spills. Screw the lid back on, ensuring it’s tight enough to prevent any accidental seed showers.
When you’re ready to sow, gently shake the jar over the soil. The seeds will dispense evenly, giving you better control over the planting process. This method is particularly useful for small gardens or indoor planting where precision is key.
Have you ever tried using a spice jar for your seeds? It’s a game-changer that can make your gardening experience smoother and more enjoyable. Give it a try and see the difference it makes in your garden.
By following these simple steps, you can transform your gardening routine and make it more efficient. Happy planting!
Final Thought
Gardening can be so much easier with these seed dispenser hacks. Each tip helps you plant seeds more efficiently.
Try them in your garden today. You’ll see better results and enjoy gardening even more. Remember, small changes can make a big difference.
Happy gardening!